
Setting up an NEC SL2100 to answer incoming calls with an auto attendant isn’t hard, but it does have a few steps. In this post I’ll show how to set up virtual extensions to direct incoming calls to customer defined auto attendants. There will be an attendant for day, for night and one for holidays in this example. This assumes a new system with System Data form 12-01 set up for Manual Night Mode Switching.
Set Up the Virtual Extensions
Like all good SL2100 instructions we start with the brilliant EasyEdit in the NEC SL2100 PCPro program. It combines forms in a logical fashion so you don’t have to poke through the System Data or dig around in a PDF.
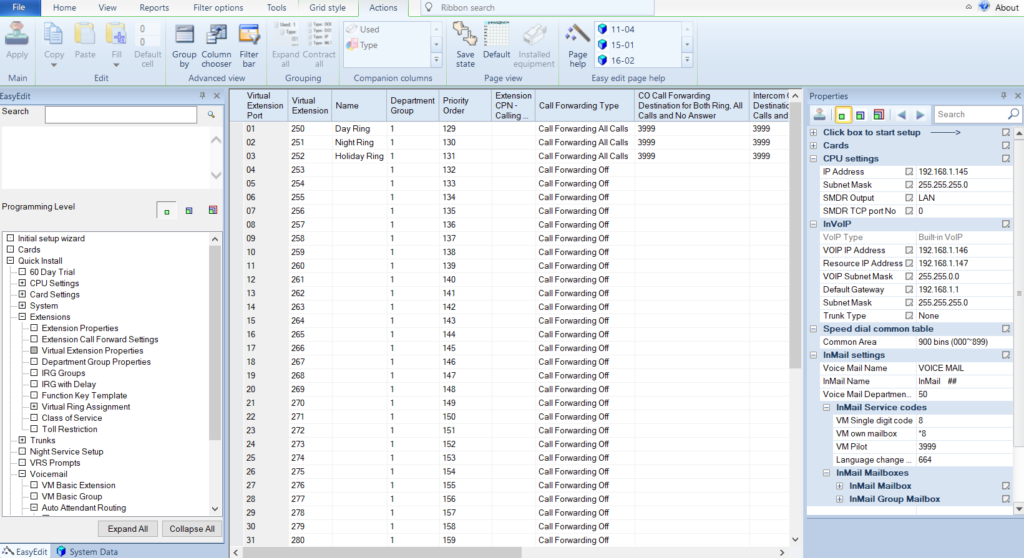
In EasyEdit expand Extensions then highlight Virtual Extension Properties. Assuming a default system you should have virtuals starting at 250. Name this Day Ring, 251 as Night Ring, and 252 as Holiday Ring. Then set Call Forwarding Type to Call Forward All Calls and in the remaining fields for call forwarding put in the voicemail pilot number. By default the VM pilot is 3999, but if not just look to the lower right on PCPro and it will show the pilot under InMail Service codes.
With all the steps outlined don’t forget to apply the changes in PCPro, then upload them when complete! PCPro does a good job of letting you know if you make changes that you did not apply, but not if you don’t upload them to the system when you are done.
Set Up Routing Mailboxes for Virtual Extensions
Next we will add our new virtual extensions to the InMail as routing mailboxes. Where we always forwarded the virtuals to voicemail above this makes them our “Auto Attendant” mailboxes where we can record greetings as well as set where button presses go.
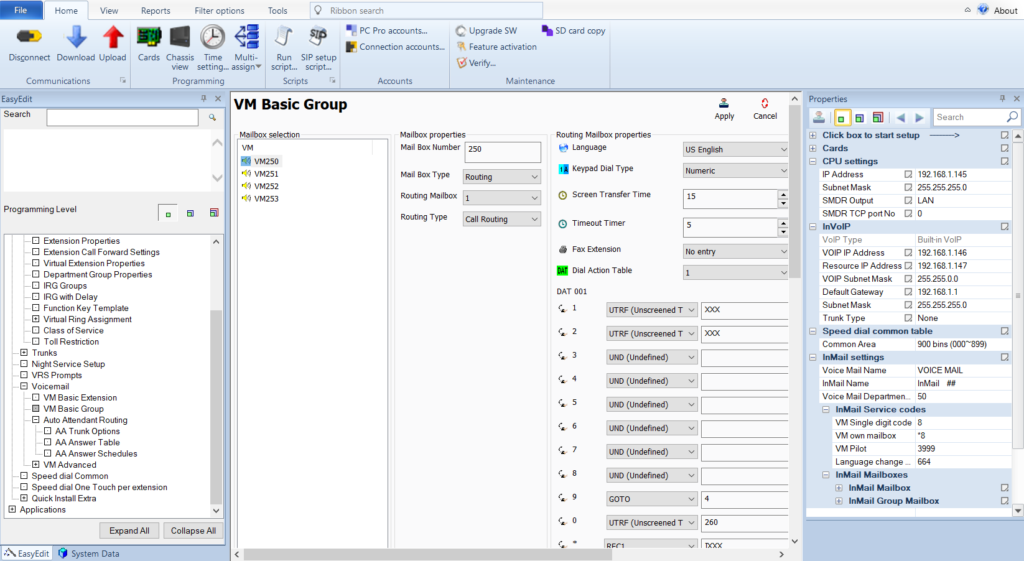
This next step is optional, but if you have a defaulted system and look at the picture below your VM Basic Group will not look like mine. I had deleted all the group mailboxes the 2100 has by default to make it “cleaner” and more clear what was in use. To delete the 31XX group mailboxes in EasyEdit, go to Voicemail, VM Advanced, VM Group Setup and in all those mailboxes just clear out the extension, then save and upload. This gives you a clean slate to work with.
Once you have that done, or even if you don’t do it, it won’t hurt anything, go to Voicemail, VM Basic Group. It seems all group mailboxes defined like above just “appear” in the VM Basic Group form. For each new group mailbox set them to mailbox type routing, routing mailbox number 1 for 250 (Day), 2 for 251 (Night) and 3 for 252 (Holiday). Then set the routing type to call routing. Once that is done for each mailbox set the DAT (Dial Action Table) for 1, 2 or 3 to match the routing mailbox. This way each routing mailbox can have its own set of buttons to define.
I’m not going to go over setting up each dial action table, I’ll save that for another post. Also you may see I have a group mailbox 253 in this picture. It is for a company directory and you don’t need it for this example, but I’ll cover setting it up in a later post as well.
Recording Greetings for Routing Mailboxes
Before making these mailboxes live we should record the greetings for them. From a phone that has a VM admin mailbox (usually the first digital phone on a new system) make a call to voicemail and log into that extensions mailbox, then dial 72 to access the system admin menu. Once in the admin menu press 4 for instruction menu messages. Enter 001 for the day greeting, 002 for night and 003 for holiday and record your appropriate greeting. Don’t forget to save the recordings before you hang up!
Set Trunks to DIL Mode
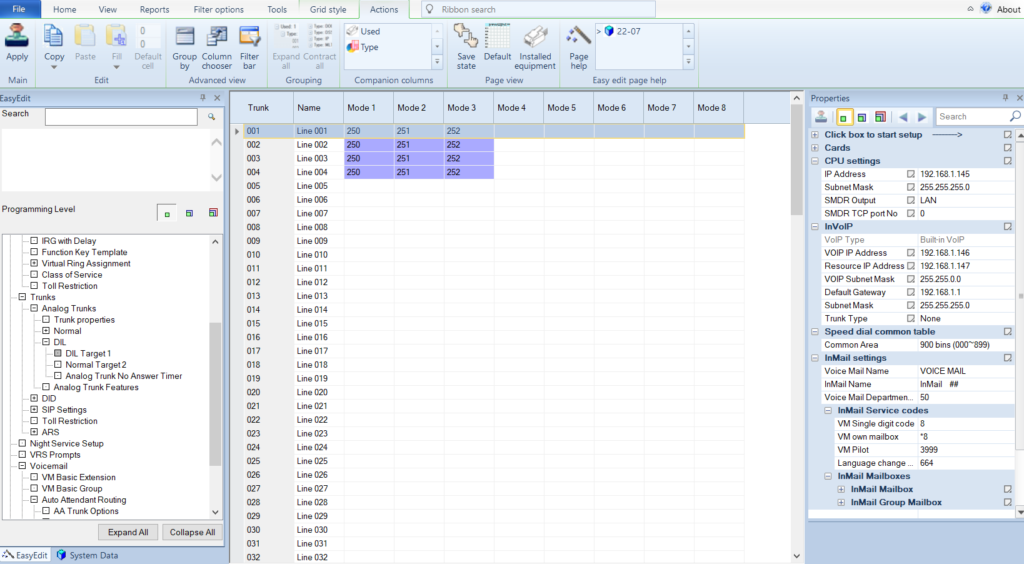
Now we’re ready to point the incoming trunk calls to the new virtual routing mailboxes. First we set the trunks in use to DIL mode by going to Trunks, Analog Trunks, Trunk properties and changing all the modes on the trunks you are using to DIL instead of Normal (not pictured). After that go to Trunks, Analog Trunks, DIL, DIL Target 1 and set up the trunks that you are using like the picture below. Note that you may have more or less trunks in use, so this depends on how your system is actually configured.
Add Day, Night and Holiday Keys to Extensions
Finally we have calls ringing into our three modes so we just need a manual way to switch those modes. This can be done automatically, but for this example we will show how to do it manually.
Go to Extensions, Function Key Template and in the top left drop down select the extension you want to change the key on. On the left select the button 09 – Night Mode Switching and move the mode 1 button to a key on the phone. Then on the left side make sure it selects mode 2 (it does this automatically if you already placed a mode 1 key) and put that on the next key. Finally place the mode 3 button on a key. Apply and upload all changes you have made!
Now you can simply press the button for the appropriate mode and the system switches in a second. If the system is in any mode besides 1 (day mode) it will show on the display of the phone so it would be hard to get wrong. If you want to define the names of the modes you can go to System Data form 12-07 and program mode 2 as Night and mode 3 as Holiday so they show up correctly on the phone.