
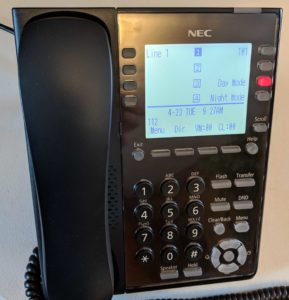
The following steps are for an SL2100 without a VIOP daughter board. They allow you to use the 8 VOIP ports that come with the system to connect IP phones like the IP7WW-8IPLD-C1 shown below. Update – as of SL2100 firmware version 4 you can use up to 16 built in VoIP ports without a daughter board – requires licensing for additional 8 ports.
I could not find one definitive source on setting up IP phones with a new system using just the built in VOIP ports so I thought I would detail my steps to help you out. I’m not going to outline starting with a boxed system. I’m going to assume you have the videos published by NEC for setting up a new system into a default state, then accessing it with PC Pro and setting up an initial IP address on your network. Also assumed are a preexisting network with a DHCP server on the subnet you will be using.
VOIP Daughter Board Programming
Updated!
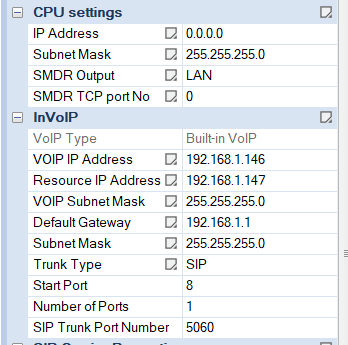
This is where I had issues as I could not find exactly how it should be configured. Here is what I have set up. I am using PC Pro and utilizing the very handy EasyEdit tab. Under Quick Install, CPU Settings, CPU IP address set to 0.0.0.0 (it will be replaced by the VOIP card). Configure default gateway and subnet mask to what suits your network. Then fill in VOIP IP address for your network. Set the VOIP Subnet for your network as well.
From there go down one step in EasyEdit to VOIP Resource IP Address and program the VOIPDB DSP IP Address as an IP one higher than the VOIP IP. Following the above example I put the DSP IP as 192.168.1.147. I left the RTP port at the default 10020. Make sure to upload all changes then reset the system for the changes to take effect.
Now when you connect to the system you will use the programmed VOIP IP rather than the old CPU IP address that you just zeroed out.
IP Phone Programming
Once more I assume you are using the default system and just want to get IP phones up and running without a ton of work. So this method utilizes the Plug and Play steps NEC outlines. When the phone comes online after programming it will grab an open IP extension and “just work”.
Plug the IP phone into the network via a POE switch port and once it is online it should cycle to a SIP Server Not Found error. From there press the following button sequence, HOLD – Transfer – * – #. The screen should show User Name: ADMIN now. Press the down arrow to move to the Password field and input 6633222 and then press the Okay softkey. Press the down arrow on the next screen to go to SIP Settings and press the circular enter button above the down button to enter the page. Press the down arrow again and then enter on Server Address & URI. Now select 1st Server Address. Finally we reach pay dirt! This is where we put in the IP we entered for the VIOP IP, which in my example is 192.168.1.146.
Back out of those settings by pressing the exit softkey and two options below Server Address & URI is SIP Server Port. Enter into 1st Server Port and make sure you have 5080 in this field, unless for some reason you changed it in form 10-16-59. Press okay once you have the port entered.
Once you have these settings input press the exit softkey until you can save your settings on the final page.
The phone will now reboot and if everything was done correctly it will just grab that next open IP phone extension. From there you can program the phone like normal. You can have up to 8 SIP phones programmed like this without purchasing an actual VOIP daughter board and additional IP licenses.