
In this tutorial I cover the physical wiring for external paging from an NEC SL2100 as well as basic programming so you can press a button or enter a code on your phone to page to that zone.
Wiring For External Paging

In the picture above I have circled the important sections needed to get paging wired up from a standard NEC SL2100 8 port digital, 2 port analog card. Each RL/Audio port can connect to an external paging device, with up to three programmable in the system. So if you had a zone for the overhead paging in the office and a zone for overhead paging in the warehouse, you could use two of these cards and program the ports separately for those zones. For this example I will stick to one.
Note the output specification I circled on the right side of the picture. The NEC SL2100 has a standard 600 ohm output for the paging, which will connect to most paging interfaces over the “Tel” port, and it will also connect directly to many amplifiers such as a Bogen TPU 100 or 250 over the “Tel” posts as these match the impedance of the SL2100 paging port.
If you use a standard SL2100 install cable pay attention to the plug you insert into the RL/Audio port. Take a look at the wiring with the clip facing down and make note of the color of the wires on the outside of the clip (see the picture above). These wires are what you will use to connect to your paging interface, or directly to the amplifier.
Programming the external paging
Once the physical connection is made we can move onto programming. Again, I’m keeping this simple with one external page zone, but the SL2100 can be programmed for up to three external zones, a lot of internal zones, and you can mix internal and external zones together if needed.
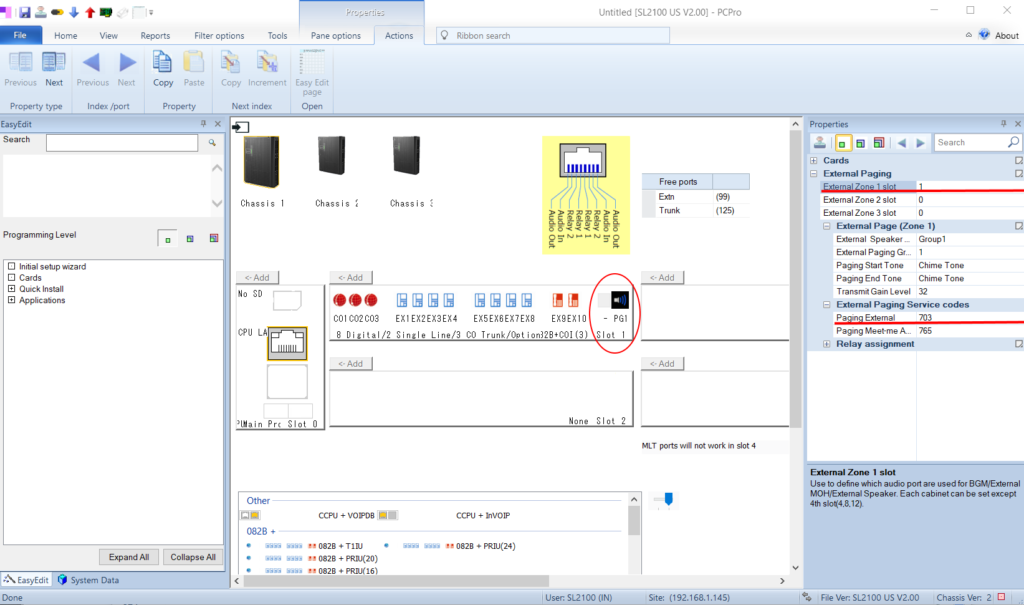
Open the PC Pro program, connect to your system and download all of the data from it. Once that is complete we are going to select the Chassis View selection near the top of PC Pro (Chassis View is next to Cards). Once you are in Chassis View you should see about the same as the picture above, but probably without the PG1 selection that I have circled if the system was never programmed with external paging. Right click on the right side blank area of Slot 1 (see the picture above) and then left click PG1 to assign this port as Page Group 1.
Once that is done the system should fill in the rest on the right hand side for you, including External Zone 1 Slot and the External Speaker Name. It will also show you the Paging External service code. From here you can change the name of the speaker group if needed, like naming this group “Office” or “Warehouse” if you were going to have multiple speaker groups. You can also change the start and end tones and change the transmit gain level. I recommend leaving the level alone as you should be changing the volume from the amplifier, not from the phone system. Don’t forget to hit the Apply stamp icon just below the word Properties, then upload the changes to the system!
Now you should be able to just dial the paging external service code (in this example and in most default systems it will be 703), then the display will show “Zone”, dial 1 and you should hear the start tone, then you can speak, and when you hang up the system will play the end tone. This is when you can adjust your “Tel” volume from your amplifier if needed.
Buttons to directly page to this zone can also easily be added to phones now. In PC Pro from the EasyEdit tab select Quick Install, Extensions, then Function Key Template. Now go to the phone you want the button added to. On the left where the button types are shown scroll down to External Group Paging and click on it. You should now see choices of three zones. Choose the zone you want (in this example we only programmed 1) and drag that button to the button you want programmed on the phone and left click to drop the programmed button down on the phone. You should now see “ExPAGE GRP 1” on the button, and you can actually click that text and change it if you want, though unless they have IP phones with self labeling keys users wont see that text. Do this to every phone that needs the paging key, then apply the changes and upload them to the system.Pressing that key will now directly page to external zone 1.