Grandstream GXW General Settings

Program a Grandstream GXW 410X FXO Gateway

Here are the steps to programming a Grandstream GXW 4104 or 4108 FXO gateway to connect traditional copper phone lines (often called POTs lines) to a Grandstream UCM. In the examples I am using a Grandstream UCM 6300 series, but it should be the same for 6100 and 6200 systems. I don’t include every step including setting up the UCM or the IP address of the GXW, all that info can be found on Grandstream’s site.

Program the Grandstream UCM

For the UCM we need to program a VOIP trunk to connect the UCM to the GXW gateway, then make an inbound route and finally create an outbound route (if you are going to use the POTs lines for outgoing).

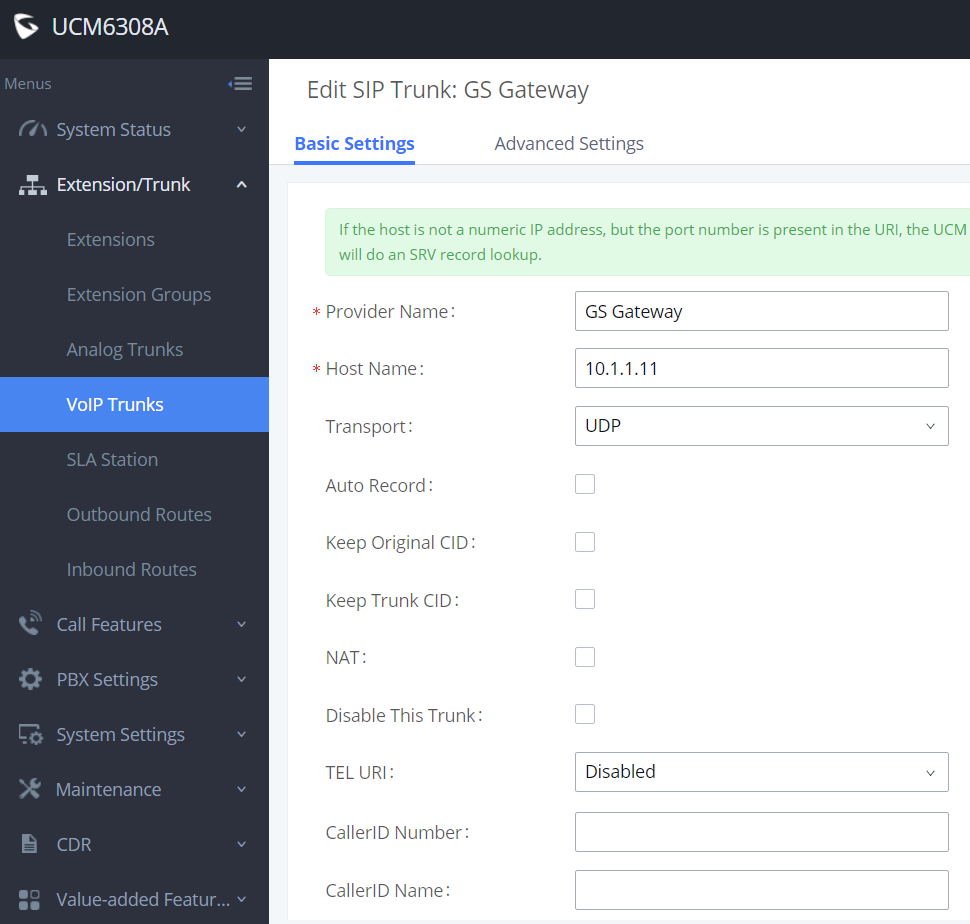
See below for the setup of the VoIP trunk to the gateway. It is created as a SIP Peer. Under Provider Name you can just type in a descriptive name of the gateway, you do not need to choose any of the default entries. For Host Name put in the IP address of the GXW gateway. Once you create it I suggest going to Advanced Settings and turning on Enable Heartbeat Detection. This will tell the UCM to “check in” with the GXW every so often to make sure they can still communicate. It comes in really handy on the System Status page where you can see the gateway is connected at a glance.

Grandstream UCM VoIP Trunk

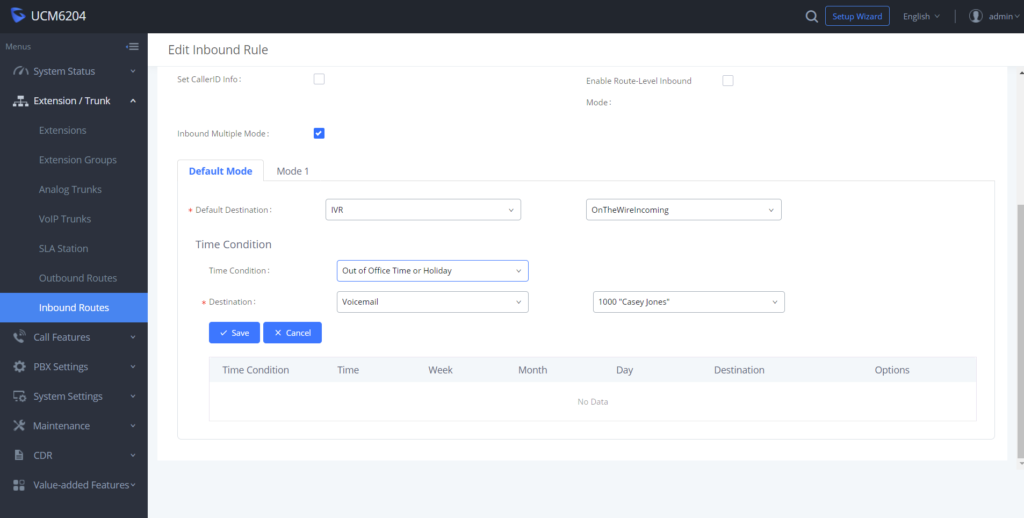
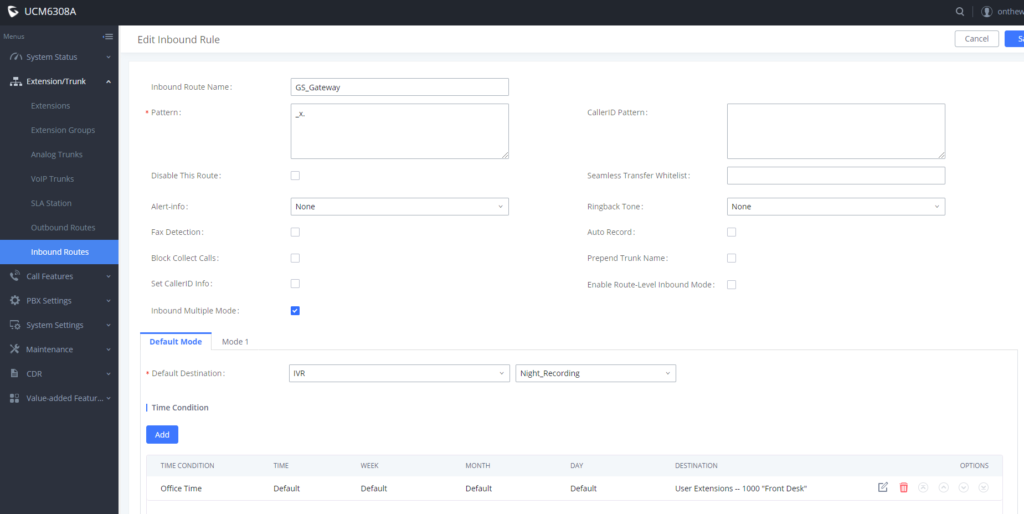
Next create your inbound routes for the gateway. I made this route on my system as a “catch all” and it will just accept any number it receives with the pattern set to x. If for instance you had more than one gateway and needed them to be separate you could program the receive pattern to separate numbers by setting the Forward All number on the GXW, which we will get to shortly.

Grandstream UCM Inbound Route

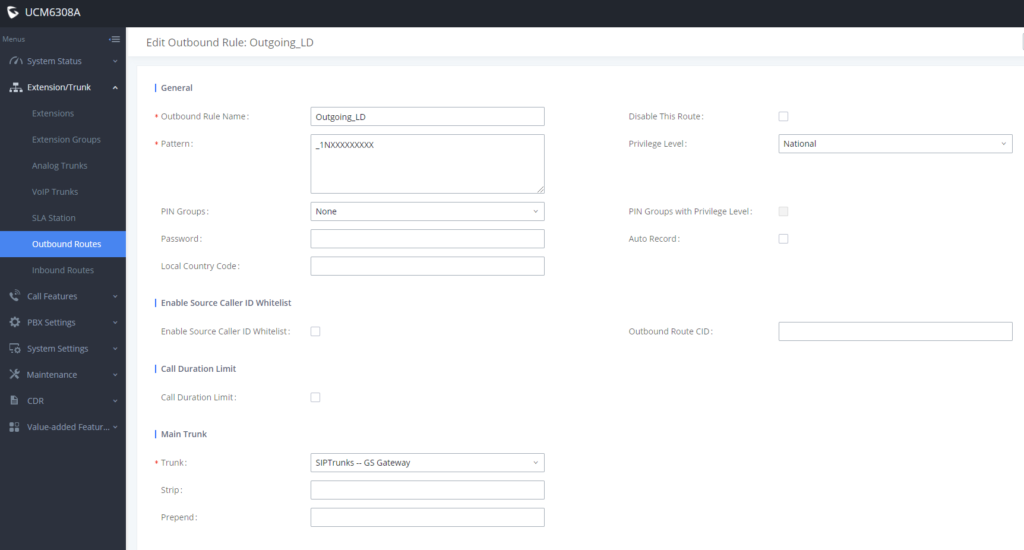
Lastly, configure the Outbound Route on the UCM if you intend to use the lines connected to the GXW gateway to call out. I did not include every example outgoing route rule. The one route rule shown is just one of many that would need programmed. Outgoing Rules depend on how you need numbers to go out (digits stripped, digits added), Privilege Level, call recording, etc.

Grandstream UCM Outgoing Route

Programming the GXW 410X

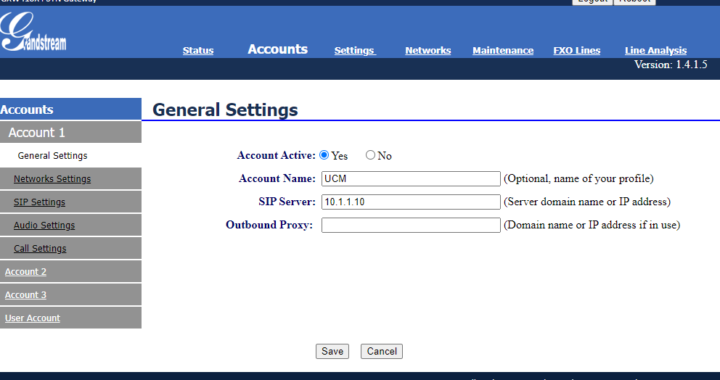
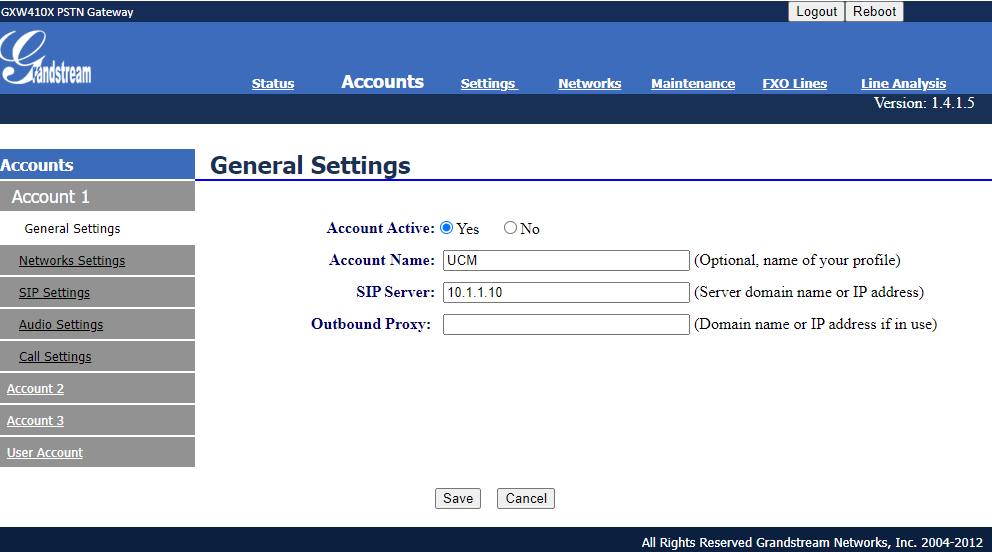
Now for programming the GXW gateway. In this example we will connect the system as a SIP Peer rather than a registered SIP extension. It is fast and easy, just remember that under Accounts – Account 1-3 – SIP Settings you have it set to No. Turning any of the account settings SIP Settings to Yes puts the account into registration mode, which you do not use for SIP Peering.

Grandstream GXW Account Setup

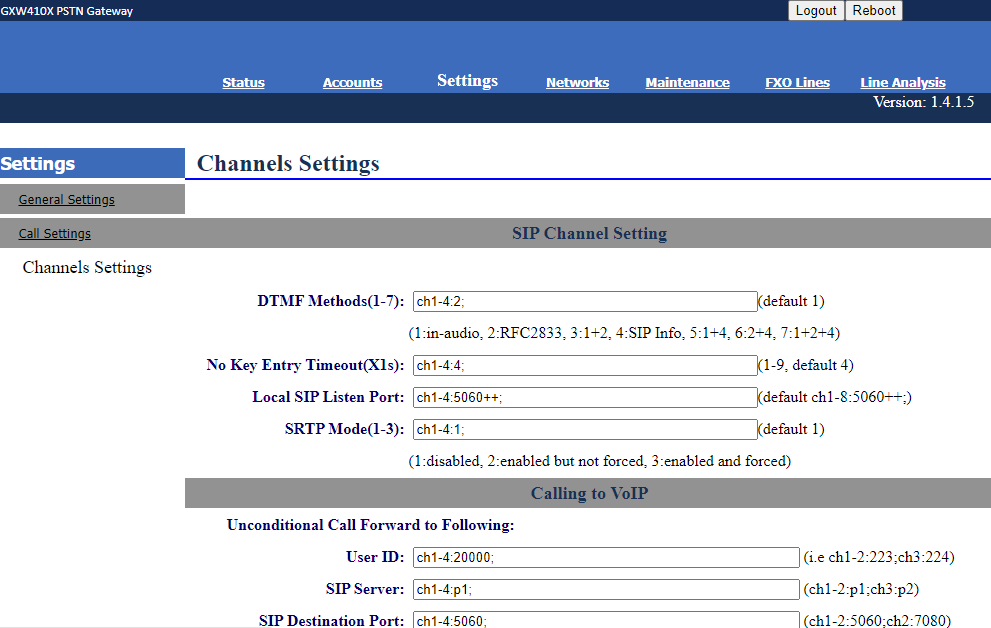
Next go to Channel Settings which is under the heading Settings. For my system I had to change the DTMF Method to option 2 for RFC2833. Also you need to configure the Unconditional Call Forward User ID. This number is what gets added to the incoming call so your UCM can process it. When it was blank incoming calls would not work for me. This is also where you could put in different numbers if you had multiple GXWs so the calls could be processed differently in the UCM. Think of this number like an incoming DID where you program the matching number on the UCM to go where you need it to.

Grandstream GXW Channel Settings

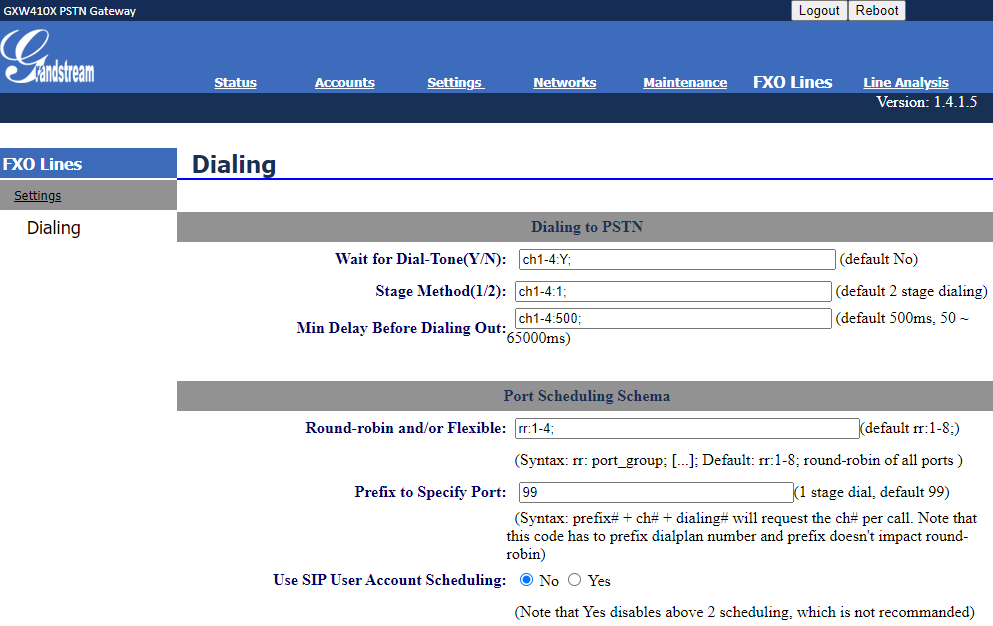
Finally we set up Dialing under the FXO Lines header, which is used for dialing out from the FXO ports on the GXW. One important change I had to make was that the default of Stage Method 2 was not suitable for me. One stage dialing should be the default, but it is not. One stage means the UCM sends the digits and the GXW relays them to the carrier. In two stage dialing you just get dial tone directly from the GXW and have to redial the number – which is of no use if you have a properly programmed UCM. I also turned on Wait for Dial-Tone so the system doesn’t start dialing before getting dial tone and potentially losing dialed digits.

Grandstream GXW Dialing

There are many more settings available in the GXW to accommodate different phone line types, voltages, line gains, timers, caller ID schemes and many other things, but for North America, and for me, the defaults worked.

Grandstream UCM Day/Night Mode and Time/Holiday Mode

The Grandstream UCM is very flexible to program for simple day and night mode switching. It also does automatic switching with time and holiday settings with a very intuitive GUI. In this post I will describe setting inbound trunks for manual day and night switching with a button on a phone and also automatic switching with office time and holiday settings.

Manual Day Night Mode

This way of setting up inbound routes is probably most familiar to customers coming from an old phone system. Someone at the office has a button on the phone they press to switch from day to night mode. It’s fast and easy and works great until someone forgets to hit the button.

First thing we do is go to Inbound Routes and select the blue box with “Set Global Inbound Mode” at the top of the screen. This takes us to the place where we turn the feature on, set the default, set the feature codes for switching, and set the BLF extension for the phone.

Grandstream UCM Set Global Inbound Mode

Enable the multiple mode by putting a check mark in Enable Inbound Multiple Mode. You can leave your Inbound Mode at default. Then enter your star feature codes for switching between the two modes. Finally enter an unused extension number that will be your BLF on the phone that changes the mode.

When done be sure to click Save at the top right of the screen and then on the next screen to click the blue box with Apply Changes in it! Do this after every change or else the settings are not saved or applied!

After turning on the multiple mode we will go to the inbound route we want to change. One tricky thing with Grandstream is when you go to the Inbound Route page it will only show the first route you have and you have to hit the drop down to see the rest. Many times I found myself making changes to a route that I did not mean to change, so pay attention to what route you are on!

Grandstream UCM Inbound Routes Selection

Once you have the route you want to edit on the screen hit the edit key just under options. Now you check the box for Inbound Multiple Mode on the actual route. Set up your default “Day” mode to go where you want during the day. Mode 1 will be where you want calls to go during “Night Mode”. Again be sure to click the blue save button on the top right then apply changes.

Grandstream UCM Inbound Route Turn On Multiple Mode
Grandstream UCM Mode 1

With these setting saved and the configuration applied you can dial the star feature code you programmed earlier to put the system into the different modes. But easier than that is just adding a BLF key to the main phone with the extension you entered before. With that BLF key you just press it and it flips between the two modes with default “Day” mode showing a green key and mode 1 “Night” showing red. Please note that with my current system there seems to be a bug where pressing this mode switching key says “Invalid route”, but the switching works correctly.

Automatic Switching with Office and Holiday Time

For companies with very well defined hours like banks having to change day and night by hand is too much work and too error prone. Instead how about putting in your hours and the holidays and let the system send the calls based on the time and date?

Just like manual you can turn on the Global Inbound Route, but you don’t need to do that for simple automatic switching. Not to get too far in the weeds, but you could turn on multiple inbound routes and during the default mode go to certain places based on the time and date, and do other separate destinations based on the time and date with the system in mode 1. For this example I’ll keep it simple and just use one inbound with time conditions.

Before using time and date switching remember that the time and date must be correct on the Grandstream. Go to Time Settings, NTP and make sure you have your correct time zone selected and the NTP server is being polled by your system.

Start by setting your Office Time. If you have a bank of days with the same hours you can do them all at once. If you have a day with different hours, like a Saturday, you create that office time separately.

Grandstream UCM Create New Office Time
Grandstream UCM Office Time

You can also set holidays so that when you are not in the office for the holiday calls are handled correctly.

Grandstream UCM Set Holiday

Remember to click the blue Save key at the top right of the screen and the blue Apply Changes button after you save!

With the office time and holidays configured we can apply them to the route. Go to the inbound route (be sure to hit the drop down and select the correct route!) and hit the edit key. Now you set up your default destination as your “Day” mode and you put in the time condition of Out of Office Time or Holiday destination as your “Night” mode.

Grandstream UCM Time Condition

In this way if your system time matches your office time the system sends calls to the default destination, and when the time doesn’t match or it is a holiday, it goes to the time condition destination. Notice you could also do this as the inverse and make your default destination your “Night” mode and set the time condition to Office Time or Holiday instead of Out Of Office and then that would be your “Day” mode. This is very similar to how we set up Inter-tel STAR programming.

Grandstream UCM Parking Lot Setup

Parking lots and park keys are a very handy way to hold calls across shared keys on a phone system. In the following tutorial I’ll show the setup for a parking lot on a Grandstream 6204 system (this should also apply to 61XX systems) and the park keys for a Grandstream GXP2130. Again, the other Grandstream phones should have the same or very similar setup.

Parking Lot Setup

Grandstream UCM Parking Lot Setup

First step after logging into the system is expanding Call Features and selecting Parking Lot to enter the Parking Lot setup page. From here you create your base extension, name it and assign your slots. In this example we are using the slots only so we can assign them individually to keys on a phone. You can park a call to the main extension, which will find an open slot in the “parking lot”, but we will just focus on the individual slots.

If you don’t currently have a parking lot, click Add Parking Lot and create your base extension, name it (Sales, Service, ext) and assign slots (two or three slots is usually plenty). Once you have done that and clicked Apply Changes, click the edit icon just below Options.

Edit Parking Lot

Grandstream UCM Parking Lot Edit

In the edit page the important thing to do is make sure to check Use parklot as extension. If you don’t do this when you assign the parking slots to keys they will not work. Also important is the Parking Timeout time. Be sure to set it for a reasonable time so that once that time limit is reached, the call rings back to the person who parked the call. Unless you have some very understanding customers you should try to keep this to 2 minutes (120 seconds). The 300 second default will not increase your customer satisfaction if they are left parked for that long. Again once you are done making changes save them and click Apply Changes on the top right of the screen.

Program The Virtual Multipurpose Keys

Grandstream GXP2130 Parking Lot Keys

Now navigate to the web page of your Grandstream IP phone. To get the IP from a running phone, simply press the up key on the phone. Put the IP address into a web browser and log in. The default username and password is admin, admin.

From the web interface go to Settings, Programmable Keys, Virtual Multi-Purpose Keys. From here what you see depends on the Grandstream phone you have. In the example above I have three VPK keys and I’m using two for my park keys. Edit the key and set it to Monitored Call Park mode, add a good descriptions (Sales Pk 1, Service Pk 2, etc.) and set the value to the park slots you assigned before. Save these changes and do this for all phones that need to see these parked calls. Keep in mind you can also program these park keys on physical keys if you choose, the programming is the same for them as the VPK keys.

Now when you are on a call you can just press this key and it will park the call to the key and light it red for everyone that has it. Then you could page someone to pick up park 1, go check on their account, go get some coffee, whatever you want.

Grandstream UCM Paging Setup

To configure paging on a Grandstream UCM use the following steps to get up and going fast.

Grandstream UCM
Grandstream UCM

Log into the UCM system and navigate to Call Features, then select Paging/Intercom. From this screen hit the + Add button near the top of the page. Enter a descriptive name in the name field (eg. “Sales Office Page”), then set the type to 1 Way. Enter an extension number that doesn’t conflict with an existing number in use. After that you just need to select the members, which are the SIP endpoints that will broadcast the page. Choose them on the left selection column, and press the blue right arrow key to add them to the list. Once that is done press the blue save key in the upper right, then at the when back to the paging intercom selection screen press the apply config key in the upper right.

You should now see your new paging group with the extension number and the members. But the key to getting this to work with Grandstream SIP phones is changing the phones settings, either from the phones web page or from Grandstream’s Zero Config setup. I will explain what to change from the web page of the phone.

Log into the phones web configuration page then navigate to Accounts, Account X (choose the account you want to respond to pages), Intercom Settings. From the Intercom Settings page change the option “Allow Auto Answer by Call-Info/Alert-Info” to yes and save. Now when the paging group is called the alert info will let the phone know to auto answer the call. Do this for all the phones in the paging group. Alternately you can make templates in the Grandstream UCM for these phones so they all have this setting enabled.

Lastly I will explain how to add a custom prompt to the paging group so that prior to the page a beep or tone plays to increase the chance of the pages not surprising the end users.

First you need to upload an MP3 of the beep or tone sound to the system. Many can be found online for free. On the Grandstream UCM navigate to PBX settings, Voice Prompt, Custom Prompt. From there select the blue box Upload Custom Prompt, and upload the MP3 of the sound you want. Once it is uploaded to the system return to the paging group you made earlier and select edit on it. Finally for the Custom Prompt field you can select the drop down and choose the file you just uploaded. Hit the blue save key and then hit the blue activate key once you are back to the paging setup screen.

When you dial the paging extension now then tone will play for the end user, letting them know a page is coming. The person making the page will also hear a tone on their headset to let them know when they can begin the page.