
When it comes to phone lines many companies consider SIP trunks due to their reduced cost and flexibility. You can usually get a SIP trunk for less than a traditional phone line and they are not tied to your current location. If you needed to move offices, you just move to one with an internet connection and the SIP trunk “follows” you. A traditional phone line would require your carrier to schedule and physically move the wiring.
NEC SL2100 systems come with 8 VoIP channels by default, which can be used for IP phones, SIP trunks or a mix. You do however have to buy additional licenses for the SIP trunks, so take that into consideration. They don’t cost much per channel (think of a channel like one phone line), so buying two or three won’t break the bank. Update – as of SL2100 firmware version 4 you can use up to 16 built in VoIP ports without a daughter board – requires licensing for additional 8 ports.
Licensing for SIP Trunks
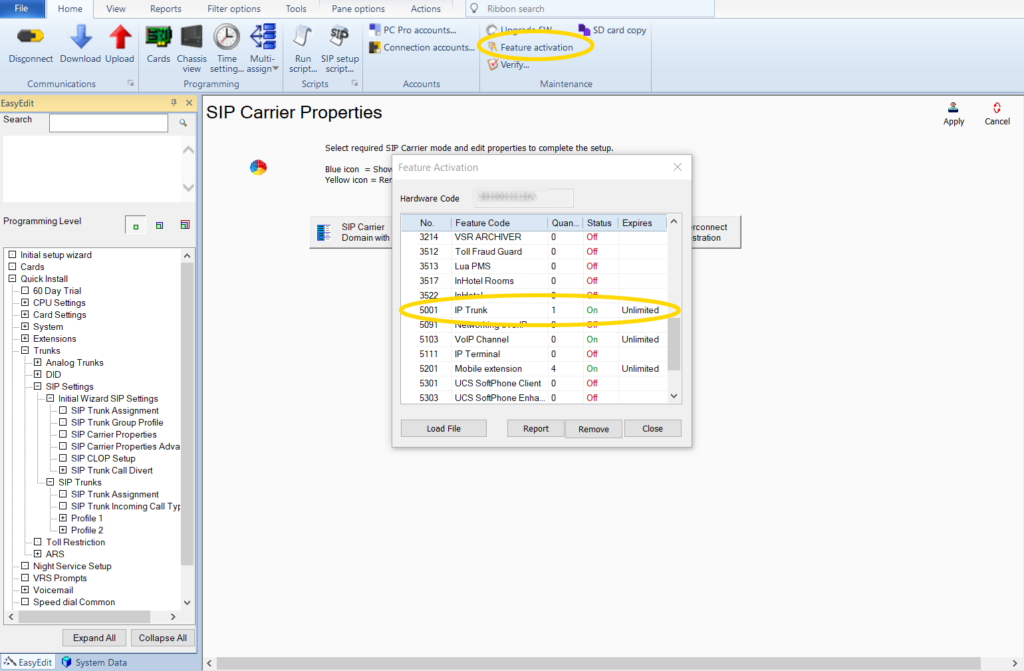
First you need to buy one or more IP Trunk licenses. You can find them sold online from reputable dealers, you just need to provide your hardware code and order license SKU BE116745. In the picture below after connecting to the system I clicked Feature Activation and scrolled down to see how many I have (I have installed one). If you order one the provider will email you a new license file in a few hours or the next day. Once you have that file you come back to Feature Activation and choose Load File and upload that new license.
Configure System and SIP Trunk Properties
The next section is actually two parts. I’m skipping the majority of configuring the system, because I covered it in setting up IP phones. This all assumes you are using a base system without a VoIP daughter card, so if you follow setting up your System IP, VoIP IP Address, Resource IP Address and Default Gateway in the link above you will be set. Note that if you make changes to any of those IPs a system reset is required after you upload the changes!
Select Easy Edit by clicking the EasyEdit button on the lower left side of the screen and expanding Quick Install, Trunks, SIP Settings, Initial Wizard SIP Settings and highlighting SIP Carrier Properties. In this example I am using SIP Carrier Domain with Registration, which I think would be the most common setup. When you click the button SIP Carrier Domain with Registration it configures the system and fills in some data for you. If you click any of the other SIP Carrier buttons in the middle of the screen the system will change some of that data, so be careful what you click!
Once your system is primed for Domain with Registration you can fill in the properties shown on the right of the screen. Check out the picture below:
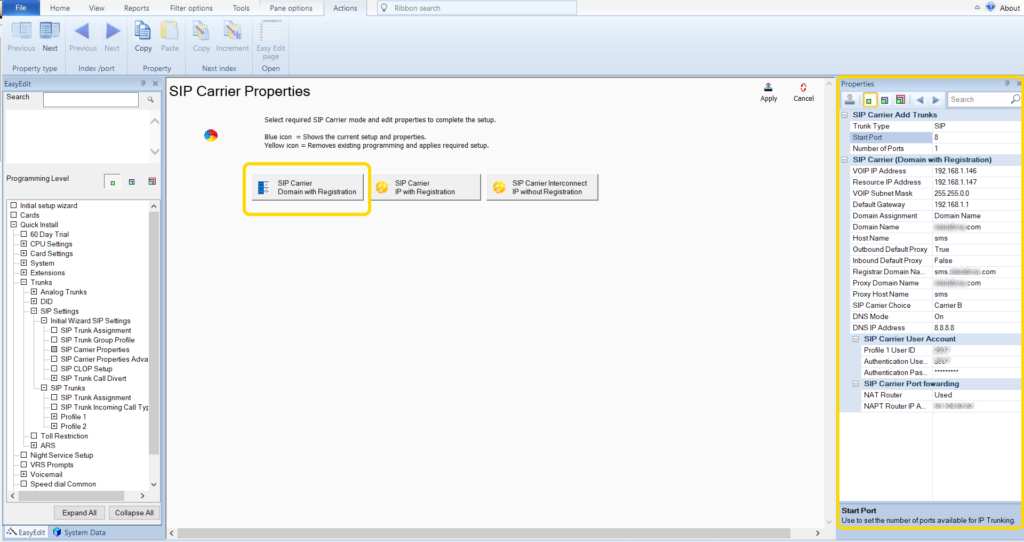
Remember in a base system you have 8 built in IP ports, and in this example I’m starting at port 8 and only using that one port. If you had three SIP trunks (and licenses for them) you could put the start port as 6 and number of ports to 3. Fill in the rest of the SIP carrier information that you should get from the carrier. It is also a good idea to set up the SIP Carrier Port Forwarding if you are behind a NAT router, which almost everyone would be. In the NAPT Router IP you would put your outside IP address. Be sure to apply and upload any changes made.
Once this is done check with your provider, either by calling them or logging into a customer portal to see if your system is connected and registered. If it isn’t try and see if the provider is even seeing your system. Maybe the user ID or password was incorrect. It may require a reset of the system to get it to start talking to the provider also.
Configure SIP Trunk DID
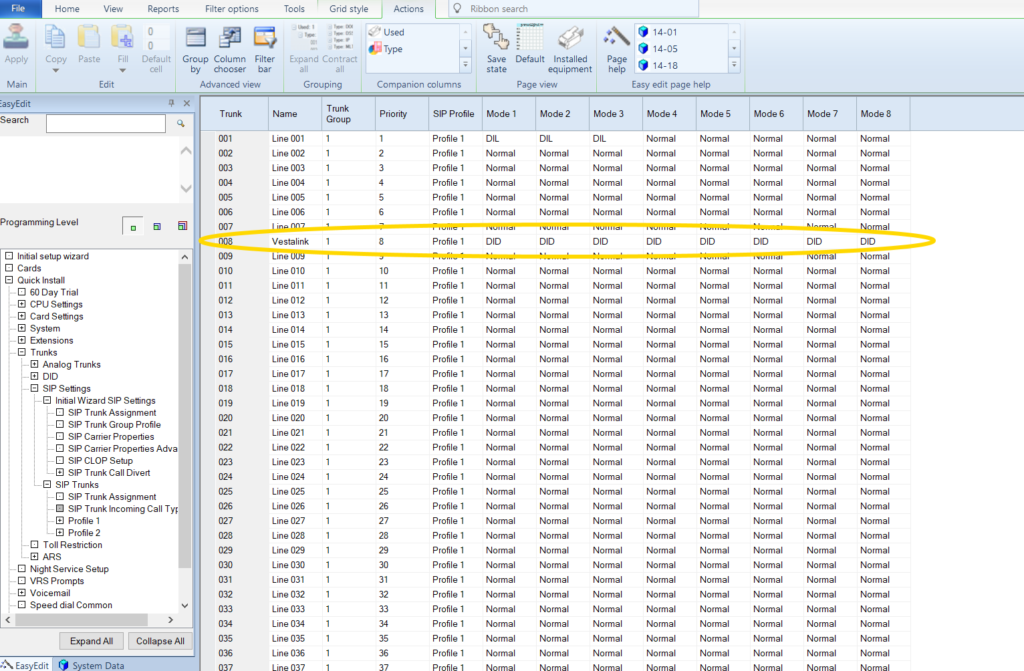
Now that you have trunks registered you need to assign the trunk type as DID for all modes. In Easy Edit you can expand SIP Trunks and then highlight SIP Trunk Incoming Call Type. Set the trunk (in my case I set it as 8 above) to DID for all modes.
With that done and uploaded you can assign the DID to ring in to the target. DID means direct inward dial and it is the number “tagged” onto the incoming call so you can route it in your system. In Easy Edit expand Quick Install, Trunks, DID, and highlight DID Routing Tables. Because we assigned it to DID above the trunk will use the table matching the mode, which for default systems means mode 1 will use table entry 0001 – 0100 and in mode 2 it will use 0101 – 0200. So for DID 0001 we put our received number, which is usually 4 digits, set a descriptive name for the DID and set the target to the number we want to ring. For the target we could assign an extension, or a virtual that goes to an auto attendant. Then for night mode go to DID Table Entry 0101 and set it up like you just did, but maybe in night mode you want the target to be a different location.