
In a previous post I went over manual day/night mode switching on an SL2100 and in this one I’ll cover the automatic option. Automatic switching is great for locations with well defined hours. If you are in and out of the office at the same time every day, auto mode is for you. You can also easily configure the holiday schedule with auto mode.
Prior to setting any of this up you need to plan on what you want to do. Most businesses are fine with two modes, day and night. Also most of the time two patterns are good enough, but maybe you have different hours on Saturday or Sunday and need three of four patterns. Have a list of your holidays on hand so they can be set up. Think through what you need and making your changes will be much easier.
Enable Automatic Night Mode Switching
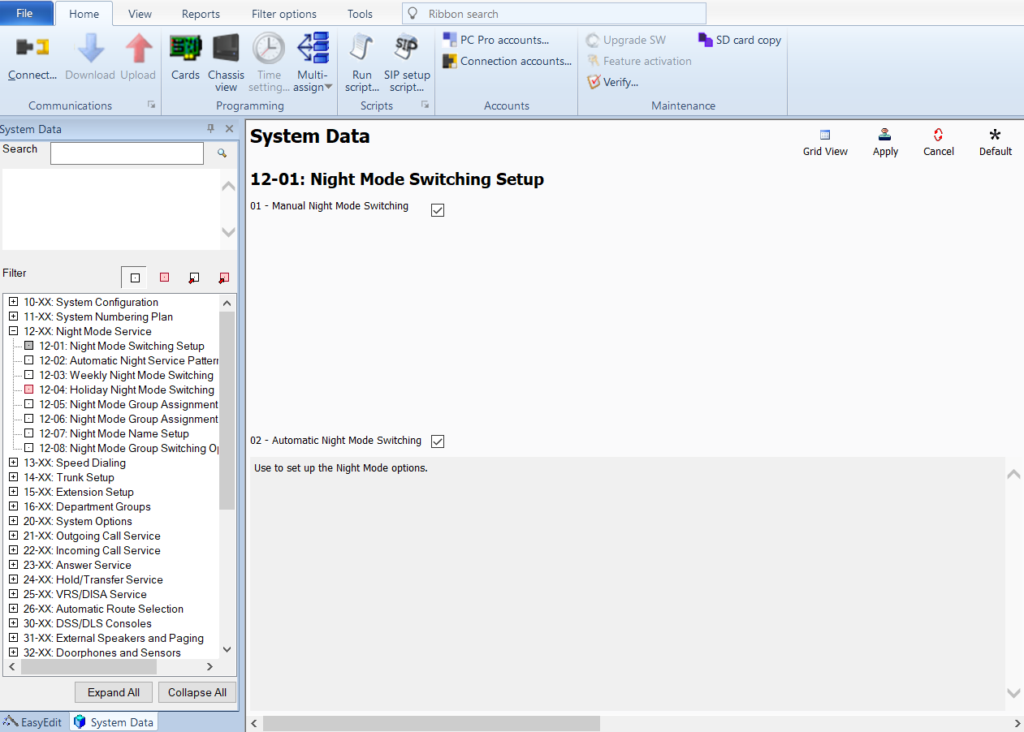
Step one after logging in to your system and downloading all the data is to go to 12-01 in System Data and putting a check mark in section 02. In the picture below you can see I have both manual and automatic checked. You can do this if for instance you need to leave the office early sometimes. With manual mode set up with day and night buttons on the phone pressing the night button will override the auto mode until the next scheduled time change. So if your normal hours are 8 to 5 and you need to leave at 4:30, pressing the manual night mode key will put you in night mode until the schedule takes back over at 5. Then it goes back to following the auto schedule.
Don’t forget after changes to hit the apply stamp near the top right corner of the screen and to upload all changes made when done! Otherwise all changes will be lost.
Configure Trunks for Different Modes
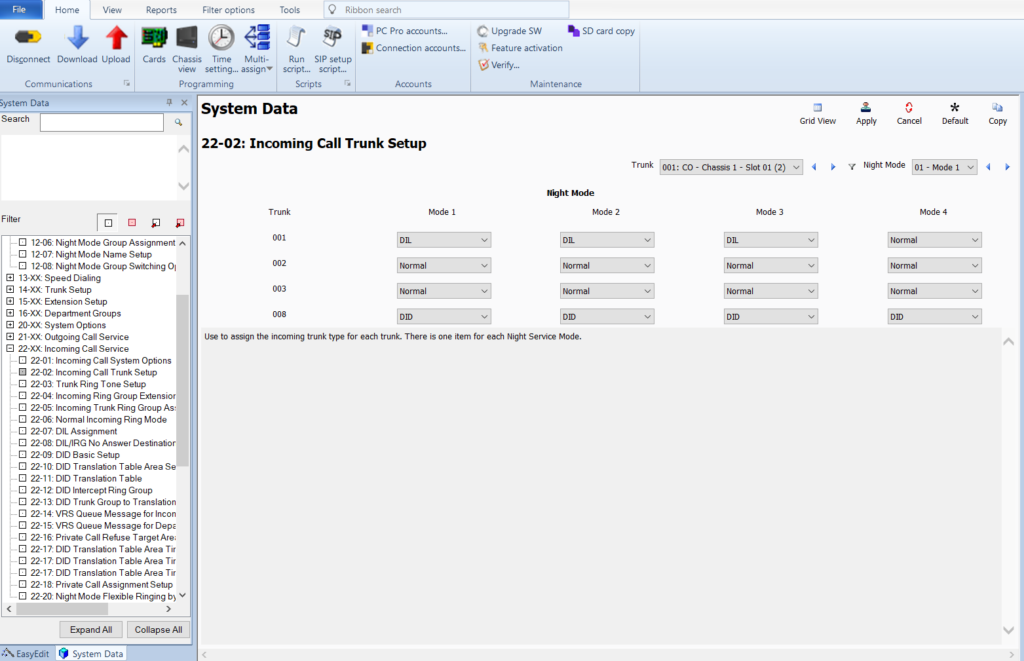
Second step I suggest is setting your trunks to do what you want when in your different programmed modes. In the picture below you can see I’m using trunk 001 for DIL in modes 1-3 and trunk 008 (a SIP trunk) as a DID in all modes. It is also possible to have your trunks go to the Normal location (like to a ring group) instead of DIL, it all depends on what you want. In my case the trunk rings a DIL because it goes to an auto attendant with a greeting and call routing. The SIP trunk goes to a DID Translation Table where mode 1 goes to one location and mode 2 goes to a different one (the same auto attendant I set up for the regular trunk).
Trunk Mode Assignment Example
Below is a picture of how I have the DIL Assignment set up for trunk 1, shown above. You will see three modes here while in this example I’m only using two. The third mode is for “special holidays” like if the office was closed for a special occasion. For now ignore it. This is just an example to show where the modes we are about to set up will go when we complete the final step.

Schedule and Pattern Configuration
For the final step we turn to our old friend Easy Edit. In the lower left of the screen click the EasyEdit button then expand Quick Install and highlight Night Service Setup.
The display you get can be confusing until you know what each part does, which I will attempt to explain. Adding to the confusion is that every night mode is shown, when most people will only use two or three. Flexibility I guess?
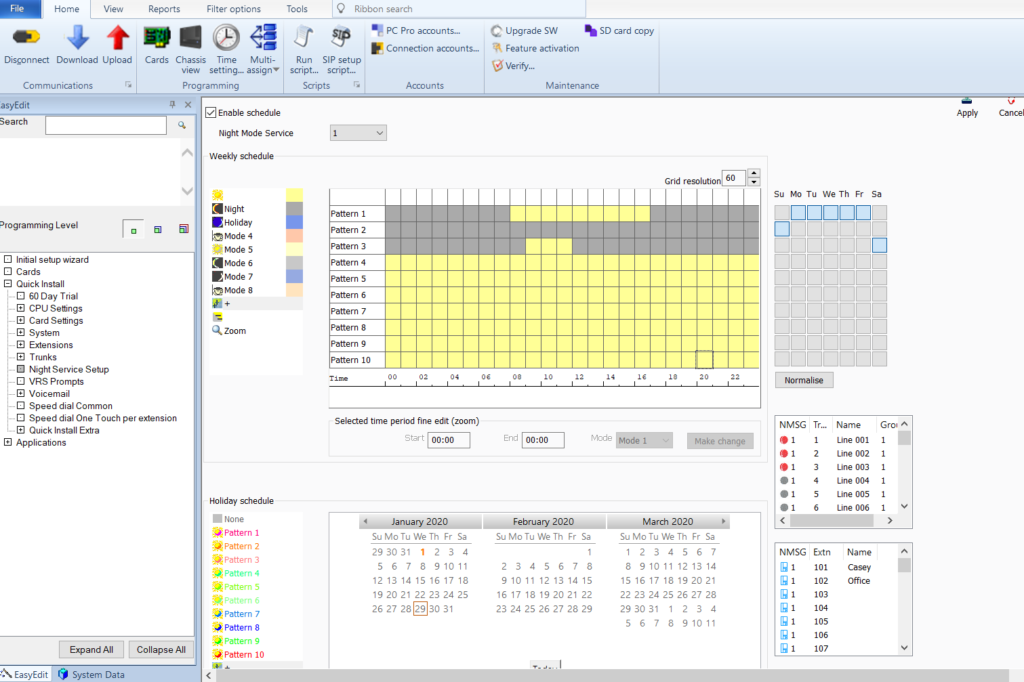
In the picture above the top left hand side has our different modes. Mode 1 has the sun icon with a yellow box that will show when assigned to the pattern. Remember above where we set mode 1 for the trunk to DIL to an auto attendant? Night mode is a grey box. For this example the office is setup with pattern 1 for Monday through Friday from 8 to 17:00 (5pm). Pattern 2 is completely grey, so you know it is all night mode. Pattern 3 is set up for Saturday so the system is in night mode for all hours except 9 to 12 where it follows day mode.
Look to the right of the colored boxes to see where I assigned the days to the patterns. Monday through Friday are highlighted next to pattern 1, and so they will follow that pattern. Sunday is highlighted next to pattern 2, which is all grey for night mode because the office is closed all day Sunday. If you needed to also be open for Sunday from 9 to 12 you could click the box for Sunday just to the right of pattern 3, just like Saturday. Or if you needed different hours for Sunday you could make a new pattern and assign it.
Below the patterns is the holiday schedule. A simple explanation would be that you create the pattern above and assign it to the holiday below. For January 1st 2020 you see the day is orange, which corresponds to pattern 2 shown just left of the calendar. So when the day matches the system will override the day schedule and follow the holiday schedule, which for pattern 2 is night for the entire 24 hours. Probably you now see the flexibility for holidays, like if you needed to be closed at noon on New Years Eve. You could make that schedule in pattern 10 for example, then assign pattern 10 below to New Years Eve.
Last thing to mention about automatic switching is it is entirely dependent on the system time and date being correct. The common issue is that someone sets all this up and it doesn’t behave like they expect because they don’t have the correct time or date on the system. Luckily most NEC phones show the time and date on the display, so it can be a hard mistake to miss. But check it to make sure, and probably just set up NTP so you don’t have to worry about it being wrong.